How to Make AutoHotkey Mouse Click at Certain Positions: The Ultimate Scripting Guide
Automation is the secret sauce of modern productivity. Whether you're a gamer trying to automate repetitive UI menus, a software tester verifying buttons, or an office pro streamlining data entry, precision is everything. One of the most common questions for AHK beginners is: Can AutoHotkey mouse click at certain positions?
The answer is a resounding yes. AutoHotkey (AHK) is a powerful, open-source scripting language for Windows that lets you control your mouse with pixel-perfect accuracy. In this 2026 guide, we’ll walk you through everything from basic coordinate clicks to advanced background automation.
---
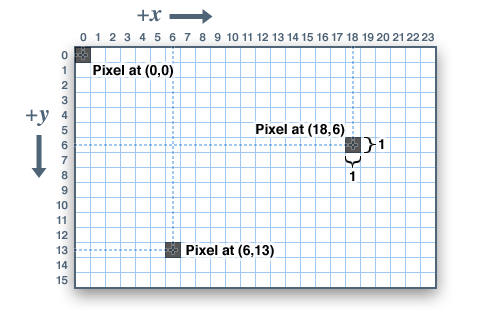
Before writing a single line of code, you need to understand how Windows 'sees' your screen. Your display is a grid of pixels. The top-left corner is $(0, 0)$. As you move right, the $X$-coordinate increases; as you move down, the $Y$-coordinate increases.
However, AutoHotkey treats these coordinates in three different ways depending on your script settings:
1. Screen: Coordinates are relative to your entire monitor setup (Absolute).
2. Window: Coordinates are relative to the currently active window.
3. Client: Coordinates exclude title bars and borders, focusing only on the app's usable area.
To ensure your script clicks exactly where you want, you must define the
---
The modern way to perform a click at a specific position is the
The Syntax:
For example, to click a button at $X=500$ and $Y=300$, your code would be:
---
If you’re new to AHK, follow these steps to build a reliable clicker in minutes:
1. Right-click any running AHK script in your system tray and select 'Window Spy.'
2. Move your mouse to the target button.
3. Look at the 'Mouse Position' section. Note down the Screen coordinates (e.g., 1240, 560).
---
---
DPI Scaling: If your Windows zoom is set to 125% or 150%, coordinates might 'drift.' Ensure your script is DPI-aware or adjust your pixel counts.
Admin Privileges: Some apps (like Task Manager or high-security games) block scripts. Try right-clicking your script and selecting 'Run as Administrator.'
CoordMode Confusion: If you don't set
AutoHotkey is the ultimate 'force multiplier' for your digital life. By mastering the
The answer is a resounding yes. AutoHotkey (AHK) is a powerful, open-source scripting language for Windows that lets you control your mouse with pixel-perfect accuracy. In this 2026 guide, we’ll walk you through everything from basic coordinate clicks to advanced background automation.
---
Understanding the Coordinate Systems
Before writing a single line of code, you need to understand how Windows 'sees' your screen. Your display is a grid of pixels. The top-left corner is $(0, 0)$. As you move right, the $X$-coordinate increases; as you move down, the $Y$-coordinate increases.
However, AutoHotkey treats these coordinates in three different ways depending on your script settings:
1. Screen: Coordinates are relative to your entire monitor setup (Absolute).
2. Window: Coordinates are relative to the currently active window.
3. Client: Coordinates exclude title bars and borders, focusing only on the app's usable area.
To ensure your script clicks exactly where you want, you must define the
CoordMode. Most pros prefer CoordMode, Mouse, Screen to avoid errors if a window accidentally moves.---
The Core Command: The 'Click' Syntax
The modern way to perform a click at a specific position is the
Click command. It’s cleaner and more flexible than the older MouseClick command.The Syntax:
Click, X, YFor example, to click a button at $X=500$ and $Y=300$, your code would be:
Click, 500, 300---
Step-by-Step: Creating Your First Click Script
If you’re new to AHK, follow these steps to build a reliable clicker in minutes:
Step 1: Use 'Window Spy' to Find Coordinates
AutoHotkey comes with a built-in tool called Window Spy.1. Right-click any running AHK script in your system tray and select 'Window Spy.'
2. Move your mouse to the target button.
3. Look at the 'Mouse Position' section. Note down the Screen coordinates (e.g., 1240, 560).
Step 2: Write the Script
Right-click your desktop, create a New > AutoHotkey Script, and paste this template:^j:: ; Press Ctrl+J to trigger
CoordMode, Mouse, Screen ; Use absolute screen coordinates
Click, 1240, 560 ; Replace with your coordinates
return
Step 3: Run and Test
Save the file and double-click it to run. Press Ctrl + J, and your cursor will instantly jump and click that exact pixel.---
Advanced Techniques for Pro Automation
1. Adding Delays (Sleep)
Apps often need a moment to load a menu. Use theSleep command (in milliseconds) to wait.Click, 100, 100
Sleep, 500 ; Wait half a second
Click, 200, 200
2. Looping Actions
Need to click the same spot 50 times? Don't write the command 50 times—use a loop.Loop, 50
{
Click, 500, 500
Sleep, 100
}
3. Randomizing for 'Human' Behavior
In gaming, clicking the exact same pixel every time is a red flag for anti-cheat. Add a bit of 'jitter' to stay safe:Random, randX, 495, 505 ; Adds 5px of randomness
Random, randY, 295, 305
Click, %randX%, %randY%
---
Common Pitfalls & Troubleshooting
CoordMode, AHK defaults to 'Window' mode. If you move the window, your click will land in the wrong place!Conclusion
AutoHotkey is the ultimate 'force multiplier' for your digital life. By mastering the
Click command and Window Spy, you can reclaim hours of your time from repetitive manual clicking. Whether it's a simple shortcut or a complex multi-stage macro, precise coordinate clicking is the foundation of effective automation. Ready to take it a step further? Look into ImageSearch—it allows your script to 'see' a button and click it no matter where it moves on the screen!